SecKit: A portable security pre-flight kit for repos and AI agents

You clone a repo, open it in your editor, and your AI assistant starts indexing it. You install a Claude skill or an MCP server someone shared. You add a dependency. Every one of those is a moment where something untrusted touches your machine, and almost nobody runs a check first. SecKit is the pre-flight you run before any of it: one script, every platform.
seckit.sh for macOS/Linux, seckit.ps1 for Windows) that bundles secret scanning, dependency and IaC checks, AI-agent-skill vetting, repo hardening, and cloud posture auditing behind one command. MIT licensed.Run it
No install step for the kit itself. Clone and run.
Fair question. SecKit scans itself after every release.
![]()
![]()
![]()
macOS / Linux (zsh/bash):
|
|
Windows (PowerShell):
|
|
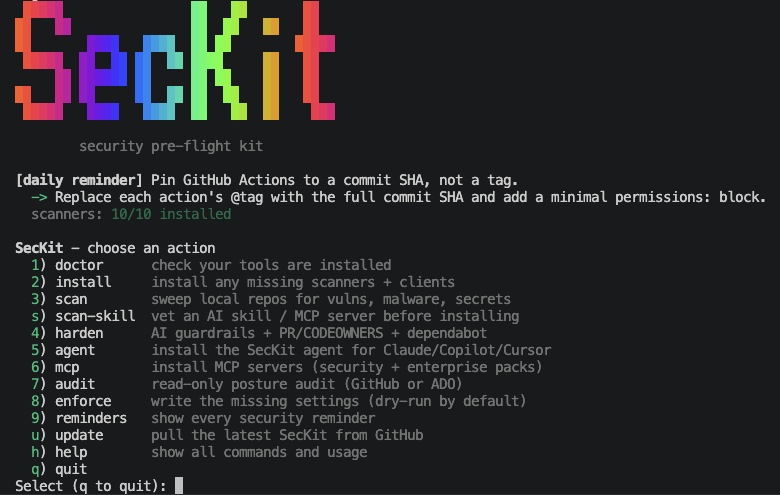
Run it either way. With no arguments you get the interactive menu above; pass a command and it runs that one action and exits, so bash seckit.sh doctor (or pwsh ./seckit.ps1 doctor) drops straight into scripts and CI without a prompt.
The first thing to run on a fresh machine is doctor, then install:
|
|
|
|
doctor reports on the tools SecKit orchestrates (jq, yq, gh, az, gitleaks, semgrep, checkov, osv-scanner, trufflehog, pre-commit); install provisions whatever is missing. You run the scanners through SecKit; you do not wire each one up by hand.
The actions
SecKit is one verb plus an action. Here is the whole surface.
| Action | What it does |
|---|---|
doctor |
Reports which scanners and clients are installed and which are missing. |
install |
Installs every missing scanner via brew/npm/pipx/scoop. |
scan |
Sweeps a folder of repos for vulnerable dependencies, code/IaC flaws, malware, and secrets. |
scan-skill |
Statically vets an AI agent skill or MCP server before you install it. Never executes it. |
harden |
Drops pre-commit, gitleaks, SECURITY.md, CODEOWNERS, Dependabot, CodeQL, and PR templates into a repo. |
agent |
Installs the SecKit playbook as a Claude subagent, Copilot chat mode, Cursor rule, or AGENTS.md section. |
mcp |
Wires official MCP servers (Semgrep, Snyk, OSV, Trivy, Scorecard, GitHub, ADO, Microsoft Learn, Terraform, Foundry) into your AI client. |
audit |
Read-only posture check against a GitHub org/repo or Azure DevOps project. Every call is a GET. |
enforce |
Writes the settings audit flagged as missing. Dry-run by default. |
reminders |
Prints every security reminder in the kit as a checklist. |
graph LR
    A[Clone any repo / get a skill] --> B{seckit}
    B --> C[scan: deps, secrets, IaC, malware]
    B --> D[scan-skill: vet AI skill / MCP]
    B --> E[harden: pre-commit, gitleaks, CodeQL]
    B --> F[audit -> enforce: GitHub / ADO posture]
    C --> G[markdown report]
    D --> G
Vetting an AI skill before you install it
This is the action I reach for most, because it covers a gap nothing else does. People install Claude skills, Copilot extensions, and MCP servers from a zip or a git URL without reading a line of them. An MCP server is code that your agent will hand tools and context to. A poisoned one can exfiltrate your tokens or inject instructions into the model.
scan-skill reads the target statically, it never runs it, and checks for prompt injection, data exfiltration, credential theft, supply-chain RCE, obfuscation, over-broad agency, and MCP tool poisoning. It prints a 0 to 100 risk verdict and a markdown report.
|
|
|
|
Hardening a repo, and the npm worm vector
harden drops the security baseline into a repo so the next commit is clean: pre-commit hooks, a gitleaks config, SECURITY.md, CODEOWNERS, Dependabot, CodeQL, and PR templates.
|
|
|
|
On a repo with a package.json it also closes a vector a scanner cannot. Self-propagating npm worms run their payload from a package’s preinstall/install/postinstall hook during npm install, before any of your code runs. By the time an advisory exists for a new variant, the hook has already shipped your tokens out. harden appends ignore-scripts=true to .npmrc, so no dependency lifecycle script runs on install, even one no scanner has catalogued yet.
The trade-off is handled rather than dumped on you: a few legit deps (esbuild, sharp, bcrypt) build native code in those hooks, so harden prints exactly which deps in your tree do this and the generated .npmrc documents how to allowlist them.
|
|
Audit and enforce your cloud posture
audit is a read-only posture check against a GitHub org/repo or an Azure DevOps project. Every call is a GET, so it is safe to point at anything. enforce then writes back the missing settings, and it is dry-run by default.
|
|
|
|
audit never changes anything. enforce does, but only with --apply / -Apply. Run the dry-run first and read the diff before you let it write.Run it in CI
The same flow drops into a pipeline. The provided workflows clone SecKit at run time, run install then scan, and publish the markdown report as a build artifact, so the only thing your repo needs is the one file. Both are soft-fail by default; flip the gate to block merges on findings when you are ready.
- GitHub Actions:
.github/workflows/seckit-scan.yml - Azure Pipelines:
.pipelines/seckit-scan.yml
Why I built it
I keep writing about the same failure mode: secrets pasted into AI chats, secrets that live forever in git history, and AI assistants that read your .env without asking. SecKit is the other half of that: a single thing you run before the risky moment instead of cleaning up after it. Pre-flight, not post-mortem.