Create your own Cryptocurrency Token (Solana)
I created my own crypto Token and I want to show you how to create your own - It only takes about 15-30 minutes.
We are going to create a cryptocurrency Token.
If you want to learn more about the differences please check out my other post about basic Crypto Tokenomics.
Why should you create your own Token?
Custom Tokens can represent an investor’s stake in a business or they can serve an economic purpose like a payment instrument. As a token holder, you can use them as a means of payment, utility or trade them with other securities to make a profit.
But the reason we’re creating it is simply to better understand the process behind the blockchain technology - Learning by doing. And simply because it’s fun to learn something new in the world of cryptocurrencies.
Requirements
- Computer (Windows, Linux or MacOS)
- Browser (Edge, Chrome or Firefox)
- Solana Tool Suite
- GitHub Account
- Phantom Wallet (min. 0.1-0.3
$SOLto cover transaction fees) - Internet
- Brain
Workflow
Here is a short overview of what we’re going to do and to give you the bigger picture:
stateDiagram
    [*] --> CreateWallet
    CreateWallet --> TokenAddress
    TokenAddress --> TokenAccount
    TokenAddress --> Mint
    Mint --> TokenAccount
    Mint --> TokenAddress
    TokenAccount --> LimitSupply
    LimitSupply --> RegisterToken
    RegisterToken --> [*]
Set up your Solana Wallet
Let’s start with setting up your Solana Wallet first.
MacOS & Linux
Open your Terminal and copy and paste the following command
|
|
Windows
Open PowerShell or a Command Prompt (cmd.exe) as an Administrator and copy and paste the following command
|
|
v1.9.3 with the release tag matching your desired release version, or just use any of the symbolic channel names: stable, beta, or edge.Confirm you have the desired version of solana installed by entering:
|
|
Generate a File System Wallet Keypair
|
|
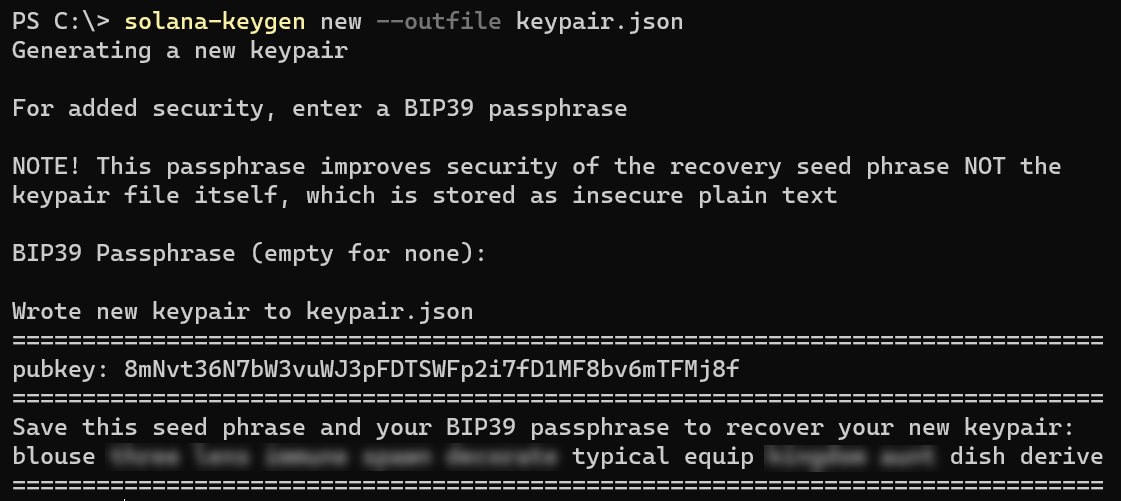
The content of the keypair.json file looks like this:
|
|
It’s basically an array of 64 values, the first 32 represent the private key
|
|
keypair.json file is unencrypted. Do not share this file with others.Remember, and as we learned in Hot and cold Crypto Wallet (Address), a wallet address like shown in the output above, is just a Base58Check Encoded Public Key Hash.
That’s why your wallet address 8mNvt36N7bW3vuWJ3pFDTSWFp2i7fD1MF8bv6mTFMj8f looks different than your public_key_bytes.
Set Solana Config
By default your RPC URL should be set to https://api.mainnet-beta.solana.com already but here is the command to verify it:
|
|
If it’s not set to the Mainnet not you can set it with this command:
|
|
Verify your Public Key (Optional)
You can also verify if your public key belongs to your key pair with the following command:
|
|

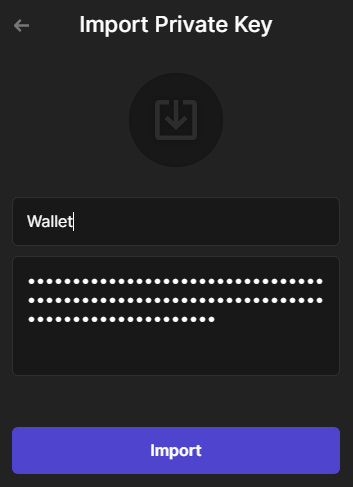
Import into your Phantom Wallet (Optional)
Copy the contents of your keypair.json and hit import on your Phantom Wallet.
Top up your wallet
Let’s top up your wallet address you just created with some $SOLto cover the transaction fees.
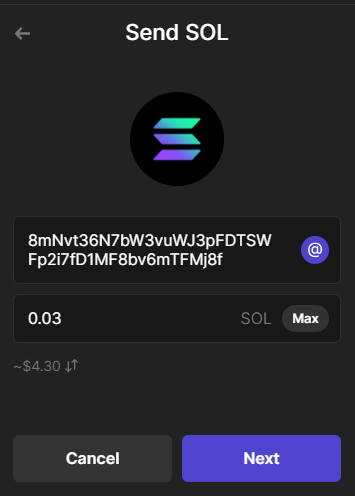
If you imported your wallet address into Phantom you can check the balance there or you can use solana balance to check:
|
|

Create Token
Now that we have sent some $SOL to our wallet address we can start creating our actual Token Address, which we will later use to mint fresh Tokens and send them to our Token Account which we will also create in the same process.
Create Token and Token Account
|
|
Token Address: 2LTQripZZZXekBg5311zu4zdzKr7VwiQ81RzVL62S72q

|
|
Token Account: CB7WEx4wtFiy6ftJWbaSvBfw1pbxe3wq65DjEbWmGRve

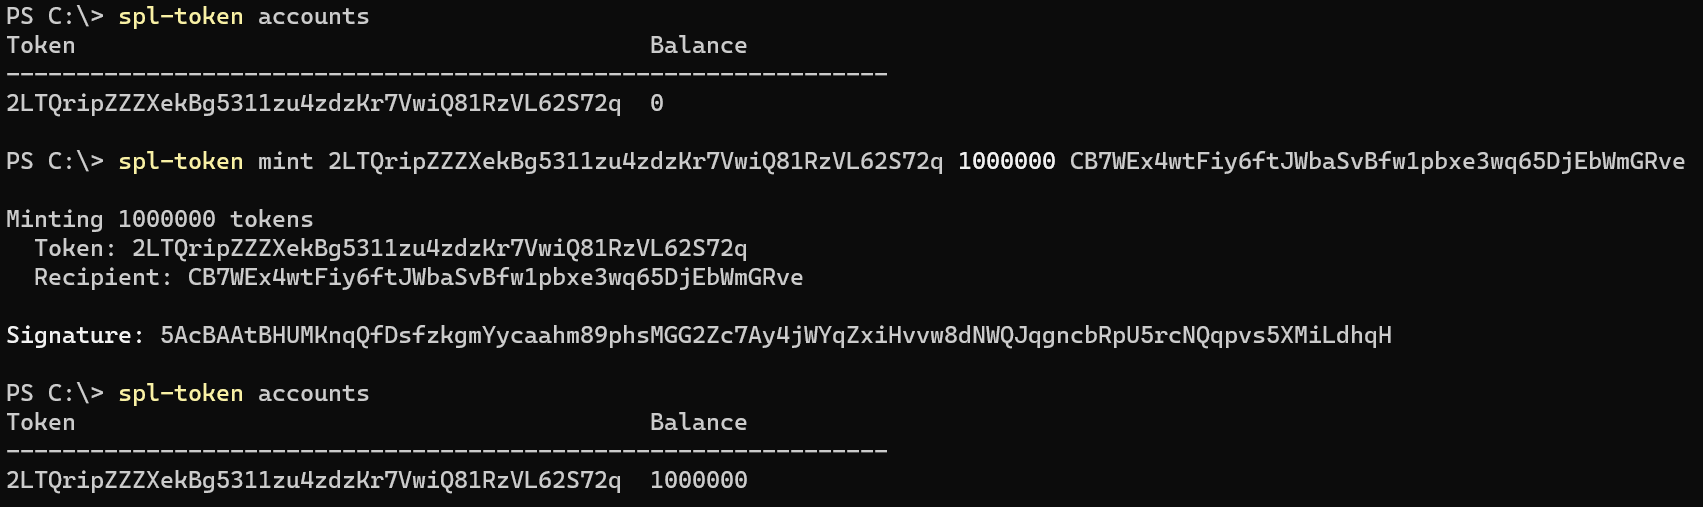
Mint Token Account
We’re going to mint 1.000.000 tokens (out of thin air) with this token address 2LTQripZZZXekBg5311zu4zdzKr7VwiQ81RzVL62S72q and then going to send them to our token account CB7WEx4wtFiy6ftJWbaSvBfw1pbxe3wq65DjEbWmGRve.
|
|
Check your Token Account Balance
|
|
Limit Token Supply
Let’s Limit your supply to prevent unlimited minting.
|
|
Transfer token to a browser wallet
|
|
|
|
Register your Token
To actually finish the creation of your Token we want to have it officially listed on the Solana Registry.
I am not going into details here, so feel free to check out my pull request at github.com/solana-labs/token-list for reference.
But basically the only details you need for your PR are:
|
|
Once your PR was merged you can see your token officiall listed on your Phantom wallet and the official solana.com registry (see solscan.io or Solana Explorer)

Summary
Okay, let’s summarize the whole thing again and show what we have done. We have created the following:
- We created a Wallet Address:
8mNvt36N7bW3vuWJ3pFDTSWFp2i7fD1MF8bv6mTFMj8fto be used as a so called Authority to fund the creation but also to mint our Token. - We created a Token (Address):
2LTQripZZZXekBg5311zu4zdzKr7VwiQ81RzVL62S72qwhich is then associated to our Token Account:CB7WEx4wtFiy6ftJWbaSvBfw1pbxe3wq65DjEbWmGRve. - In the end we registered our Token
2LTQripZZZXekBg5311zu4zdzKr7VwiQ81RzVL62S72qon the Solana Token Registry to make it available.
If you want to know how to create a secure wallet address, check out my post Create a secure and anonymous Crypto Wallet.