Build your own GPT-Powered AI Voice Assistant with Azure OpenAI and Cognitive Services
Let’s build your own AI voice assistant which is better than Amazon’s Alexa using Azure Cognitive Services (SST and TTS) and OpenAI. All you need is a bit of basic Python understanding, an Azure account, a microphone and a speaker. This will take about 15 minutes to set up and you’ll be done.
For those who don’t have patience and want to get it done immediately: A working version, written in under 80 lines of code can be found here.
By combining the speech recognition and synthesis capabilities of Azure with the power of OpenAI’s GPT model, we can create an intelligent and conversational voice assistant. Let me provide you step-by-step instructions and code examples to help you get started.
Prerequisites
Before getting started make sure you have the following prerequisites installed on your system:
- Create a Speech resource in Azure
- An Azure OpenAI Service resource with a model deployed. For more information about model deployment, see the resource deployment guide.
- Python (at least 3.7.1)
- Azure Cognitive Services Speech SDK
- Python libraries: openai, os, requests, json
Currently, access to Azure OpenAI is granted only by application. You can apply for access to Azure OpenAI by completing the form at https://aka.ms/oai/access.
|
|
Workflow
Let me give you the bigger picture upfront for a better understanding what we’re going to do:
graph TB
    SpeechToText("Azure Cognitive Services (STT)") --> AzureOpenAI("Azure OpenAI")
    AzureOpenAI --> TextToSpeech("Azure Cognitive Services (TTS)")
- The Speech-to-Text (STT)
SpeechRecognizercomponent from Cognitive Services recognizes your speech and language and converts it into text. - The OpenAI component sits in between which acts as the AI voice assistant component, it takes the input from the
SpeechRecognizerand generates an intelligent response using a GPT-model. - The repsonse will be synthesized accordingly into Text-To-Speech (TTS) by the
SpeechSynthesizer.
Setting up Azure Cognitive Services
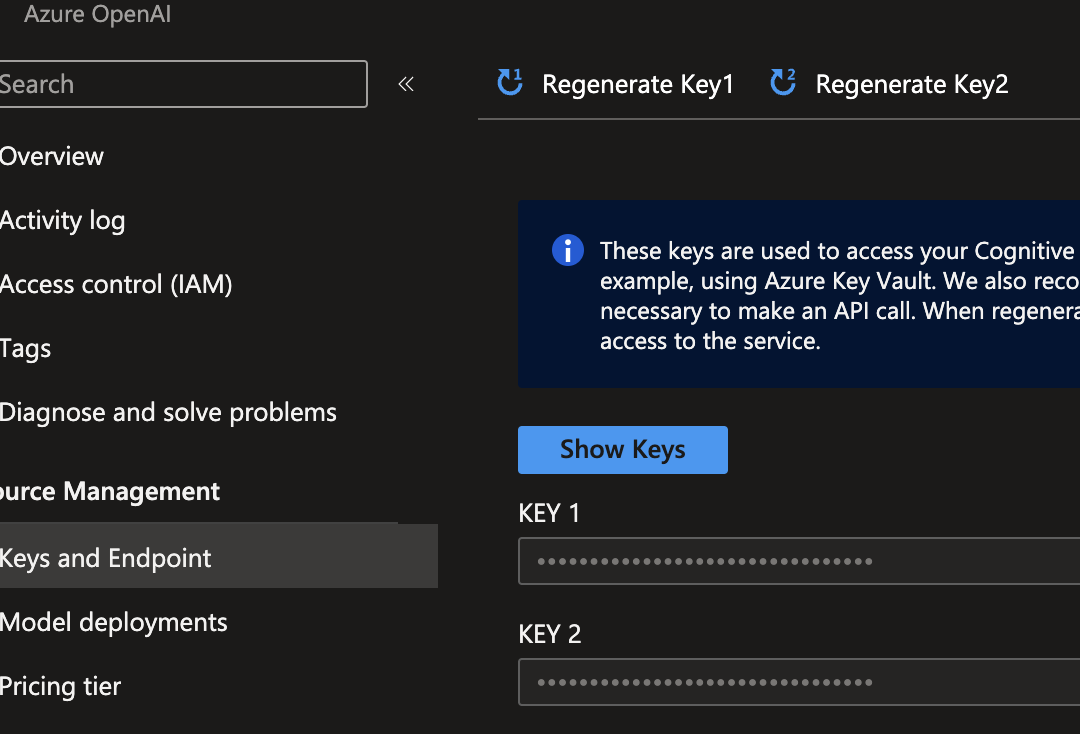
First, obtain your Azure Cognitive Services subscription key and region.

Then, using the Azure Cognitive Services Speech SDK, you can configure the SpeechConfig object with your subscription key and region. For example:
|
|
|
|
This configuration allows you to access Azure’s speech recognition and synthesis capabilities. All voices can be found here.
Integrating Azure OpenAI
In addition to Azure Cognitive Services, we will integrate OpenAI’s GPT model to generate intelligent responses. First, ensure you have an OpenAI API key.
Then, using the OpenAI Python library, you can configure the API with your key. For example:
|
|
|
|
With this integration, we can leverage the power of GPT to generate contextually relevant responses based on user input.
Recognizing and Generating Speech
The core functionality of our voice assistant involves recognizing user speech and generating appropriate responses. Azure Cognitive Services provides the SpeechRecognizer class for speech recognition. Here’s an example of recognizing speech from an audio input stream:
|
|
Once the user’s speech is recognized, we can use OpenAI’s GPT model to generate a response. Here’s an example of generating a response using OpenAI:
|
|
Synthesizing Speech Output
To provide a natural voice output, Azure Cognitive Services offers the SpeechSynthesizer class for speech synthesis. You can synthesize the generated response into speech using the SpeechSynthesizer’s speak_text_async method. Here’s an example:
|
|
Example and Code

Here is a working version written in Python.
Next steps
We covered the process of building a GPT-powered AI voice assistant using Azure Cognitive Services and OpenAI. The next step is to port this onto a Raspberry Pi which we equip with a speaker and microphone. More details in the next post.