Azure Github Actions and Workflows

Let me give you an introduction how to use the power of GitHub Actions and Workflows to deploy resources into Azure. I’m going to explain you the basics of GitHub Actions, Workflows, runners and how to deploy resources into Azure. At the end of this post you should have understood how GitHub Actions and Workflows work together to give you a kickstart to run your own.
Prerequisites
The only thing you need is a GitHub Account. If you don’t have an account yet then you should create one here.
What is a GitHub Action?
A GitHub Action is an individual task that you can combine with other Actions to create jobs and customize your workflow with the help of specific steps. You can either use Actions shared by the GitHub community or create your own
Why GitHub Actions?
That’s the cool thing about GitHub Actions, it is what the name says, an Action. Usually you have code sitting in your GitHub repository and now you want to get this code running or deployed. Simply said, GitHub Actions help you automate your software development workflows in the same place you store code and collaborate on pull requests and issues without the need of a 3rd party CI/CD platform like Azure DevOps or Jenkins.
Another advantage of using Actions is that you can reference other publicly available repositories on GitHub directly.
How do GitHub Actions work?
Different types of GitHub Actions can be build with Docker container and JavaScript. Actions require a metadata file to define the inputs, outputs and main entrypoint for your action. The metadata filename must be either action.yml or action.yaml.
A very important part here is the main entrypoint. The strengths of GitHub Actions is that you can use whatever code you prefer and that’s where your entrypoint comes into play. The GitHub Action executes the entrypoint in your specific language. If you’re good in Python, C#, Go or even Bash, go ahead and use your preferred language.
If you plan to combine your own actions, workflows, and code in a single repository, I recommend storing actions in the .github directory (unless you plan to use public Actions). For example, .github/actions/action-a and .github/actions/action-b.
Where do GitHub Workflows come into play?
You can think of continuous integration (CI) and continuous deployment (CD) directly in your GitHub repository. Workflows are custom automated processes that you can set up in your repository to build, test, package, release, or deploy any code project on GitHub. Compared with Azure Pipelines in Azure DevOps you have pipeline tasks which execute specific steps. GitHub workflows in turn use GitHub Actions to execute these as steps. To use an Action in a workflow, you must include it as a step.
GitHub Workflows have to be stored in the .github directory. For example, .github/workflows/workflow-a or .github/workflows/workflow-b.
GitHub runners, wait what?
In order for your code to be executed, it must run somewhere and this is done on and with so-called GitHub runners. Comparable to hosted pipeline agents in Azure DevOps. Workflows run in Linux, macOS, Windows, and containers on GitHub-hosted runners. Alternatively, you can host your own self-hosted runners.
What options do I have to deploy Azure resources with GitHub Actions?
You several options to deploy resources into Azure. You can either use publicly available Actions like
- Azure CLI (
azure/cli) action sets up the GitHub Action runner environment with the latest (or any user-specified) version of the Azure CLI. - Azure PowerShell (
azure/PowerShell) action sets up the GitHub Action runner environment with the latest (or any user-specified) version of the Azure PowerShell module. with which you can then run Azure CLI or Azure PowerShell scripts to create and manage any Azure resource.
See sample workflow with public Actions below.
Other options are to use or create your own Actions (see segraef/aga).
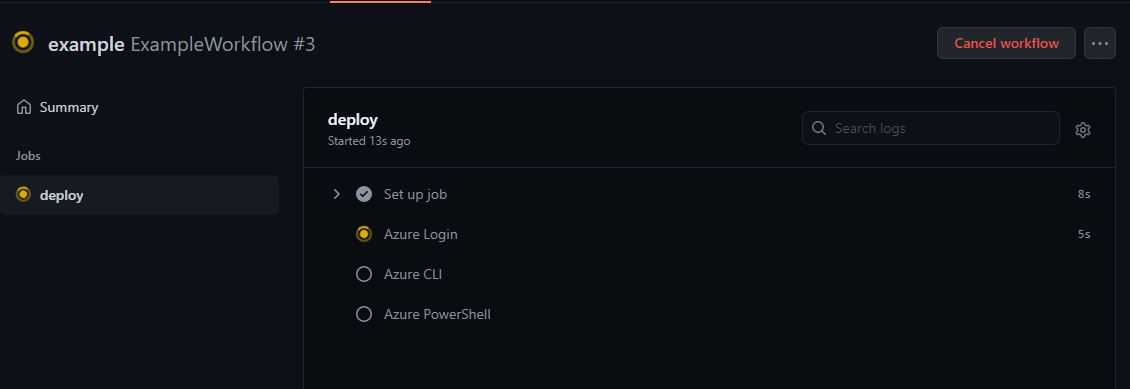
Sample Workflow with public Actions
This example workflow uses following publicly available Actions
- Azure Login (
azure/login) - Azure CLI (
azure/cli) - Azure PowerShell (
azure/PowerShell)
Within your Workflow you have to login to Azure. Before running Azure PowerShell scripts you can make use of the Action Azure Login (azure/login).
In order for this action to log into your environment you need Azure service principal credentials. Easily create your own service principal credentials with the help of this az cli snippet
|
|
Once you’ve created your credentials go ahead and add them as secret AZURE_CREDENTIALS to your GitHub repository.
Dependencies on other GitHub Actions
If you’re looking for a way to use managed identities, you can also use my GitHub action (segraef/azlogin) which I’ve equipped with the ability to use managed identities. Remember, Managed Identities can only be used in conjunction with Self-Hosted Runners.
Once login is done, Azure PowerShell action will use the same session to run the script.
Sample workflow to run inlinescript using Azure PowerShell
The following sample workflow can be found here.
Place this workflow file in your in your .github directory, for instance .github/workflows/example.yml. Once you commit and push your code the Workflow starts to run and executes your Actions.
Congratulations you just created and started your first GitHub Workflow!